Sunday, March 27, 2011

Eggs and Friends

I'm not going to lie, we use a lot of eggs in my house. Whether they are used to make breakfast, lunch, dinner, or a snack, in baking, or as a wash of some sort - we use them. Vincent loves eggs and I try to do different things with them so that the thought "oh, scrambled eggs again" never enters his mind. I think that I'm fairly successful at varying my uses of the edible incredible egg!

So, without further consideration - here are 2 uses of the egg for you to try!

Perfectly Boiled Eggs with Fresh Raspberry Muffins


Boiled eggs. I'm not talking about those nasty dry and crumbly boiled eggs with a green ring around the yolk that smell like a baby's diaper that needs changing. You know, the ones that you find on salad bars and things. These are creamy, light, and perfectly egg-y. Place the eggs in a medium saucepan and cover with about 1 inch of water above the eggs. Bring the water to a boil, remove from the heat and allow the eggs to soak in the hot water bath for exactly 10 minutes. Run cool water into the pot until all of the water is cool to the touch and keep the eggs in cool water for 2 minutes. Roll them on the counter to crack the shells and remove the shell and membrane. Slice in half, sprinkle with sea salt and cracked black pepper and serve! Yum. These are a tasty dose of protein that you can add to any meal at any time of day. Be careful not to eat more than 7-8 yolks a week in order to prevent a spike in cholesterol. Studies show that just 7-8 eggs are an okay (and paleo friendly) part of your diet.

I made these eggs with a batch of absolutely delicious muffins. The muffins were a plain milk batter with a layer of fresh sugar coated raspberries in the center. I love surprises like these! The concept behind these muffins was to maintain the integrity of a delicate berry like raspberries by placing a tablespoon of them in the center of the muffin batter, rather than folding the berries into the batter as a whole. So, I filled each muffin liner up half way with the batter and spooned some fresh raspberries, which I sprinkled with sugar to taste, and topped each one with another heaping tablespoon of batter. To top it off with a little texture and flavor - cinnamon sugar! Each muffin came out light and fluffy with a dense middle layer of raspberries. They were absolutely delicious; Vincent ate 3 before I ever even sat down at the table! (you know that means they were good!)


Another use of the egg is one that I find to be a great quick dinner when you really don't want to dirty a million dishes, but you want something tasty and whole. Roasted asparagus with scallion scrambled eggs and havarti. Okay, you don't need cheese to make these eggs wonderful, but I had some creamy havarti in my cheese drawer - and I thought why not? Roasted asparagus are essentially a staple in my kitchen. We eat them with roasted chicken, rice, salmon, whatever - so eggs are just another good partner for this favorite. Wash the asparagus and "trim the stems." It may be upsetting, but the best way to do this is to hold the flowering end of the asparagus spear with one hand and bend the blunt end back until it snaps off. Usually more asparagus snaps off than I desire, but you just need to deal with it. This is the best way to serve the fresh part of the spear and you can save the ends for use as vegetable stock or in soup. Drizzle the asparagus spears with a light coating of olive oil and sprinkle with salt and cracked pepper. Roast in a 375 degree oven for about 20 minutes, or until bright green and tender. The time will vary with the thickness of spears. While the asparagus are roasting, you can whip up some homemade biscuits or toast and the eggs. I like to use a few whole eggs and a few egg whites, but use your better judgement. Also, I buy eggs that have extra Omega 3 because we really need this vitamin in our diets. (as if I don't eat enough salmon!). Whip the eggs with a fork until your forearm hurts - this will keep them fluffy. I add a tablespoon of milk or ice water to keep the fluff up, also. Dice 2 scallions for every 4 eggs and add them about 3/4 of the way through the cooking process. Now I cook my eggs over medium heat, because there is nothing worse than burnt eggs. Another tip is to remove the pan from the heat when there is still a little liquid left to the eggs because the pan will continue to cook them without overdoing it. Sprinkle with grated havarti for extra umph and serve them over a bed of roasted asparagus. You will go to bed happy that night. I promise.


Tuesday, March 22, 2011

Kiss Me I'm Irish Italian

Ok, so I'm only a little Irish... but that's what you're supposed to say on the green beer holiday - St. Patrick's Day! I was at work for this one, but I whipped up a yummy and healthy rendition of Shepherds Pie before my shift so that we had a great meal anyway. Now this dish is traditionally made with lamb (hence, the shepherd part) but I don't eat lamb, so I used turkey instead! And of course I gave it a little Procido twist. Check it out if you're looking for the ultimate comfort food with less calories.

St. Patrick Turkey Pie


1 lb ground white turkey meat
1 medium yellow onion
1/2 purple onion
2 Tbsp tomato paste
1 Tbsp flour
1 12 oz. bottle of beer
3 carrots
1 cup frozen english peas
1 stalk celery
1/3 bell pepper
2 cups chicken stock
4 baking potatoes
Grated reduced fat cheddar cheese for the top (optional)
fresh parsley


Peel the potatoes and cut them into chunks. Place in a medium pot and cover with water. Bring to a boil and cook until soft. Reserve. Heat a large pan over medium high heat and add a Tbsp of olive oil. Chop and saute the onions until translucent and add garlic. To this, add the ground turkey and chop it up into small pieces as it cooks through. Mix the tomato paste and flour and combine with the turkey mixture, stirring constantly for a few minutes until incorporated. Give the mixture about 1/2 cup of chicken stock and add the carrots, peas, celery, and bell pepper. Allow this to cook for 3-4 minutes and pour the bottle of beer on top. Reduce heat and cook for an additional 7-8 minutes or until thick and saucy. A lot of freshly cracked black pepper, sea salt, and some paprika + nutmeg really add something to the flavor of this dish. While the veggie-turkey mixture is simmering away you can mash the potatoes. Drain the water and add the chicken stock 1/2 cup at a time to the potatoes as you whip them. At this point, I also added 9 cloves of garlic to make garlicky mashed potatoes. If you desire, you can add a little earth balance or butter for flavor and creaminess, but if you're really looking for a healthy meal the chicken stock will do the trick! Sprinkle in some freshly chopped parsley and combine. Place the turkey mixture in the bottom of a large baking dish and cover with the mashed potatoes. Top with a handful of shredded cheddar cheese if desired. Bake in a 350 degree oven for about 30 minutes. Yum!!! 

The beer in this dish really gives the turkey a smoky and deep complexity that is great. I think the nutmeg almost aids the beer in transforming the turkey into a more gamey tasting protein and you probably won't even miss the lamb if you're willing to compromise. This dish incorporates a nice ratio of vegetables to meat and starch, although you could reduce the number of potatoes if you prefer. I have also considered making this dish with zucchini and mushrooms instead of the ground turkey for a completely vegetarian delight! You may be asking yourself - what the hell is she doing adding bell pepper and celery to shepherds pie? Well that's where the Procido in me comes to play. In New Orleans, we start almost every really good dish with a trinity of onions, celery, and bell pepper - so I thought "it can only make this better" and I had some extra celery and bell pepper anyway! I think it really works here, too.

Unfortunately I somehow deleted the pictures of this dish, but if you think it sounds appealing you should try it. It's a warming meal with little repercussions.

Monday, March 7, 2011

Breezy Seaside Cake

This is it! The moment I've been dancing around for several months... the creation of my first wedding cake for Laura and Kevin Perkins! Until recently, I had not ever even attempted multi tiered cakes. The Cornflower Blue Blog is an account of my first 2 tier cake, which I made as a practice cake for this event. I learned that leveling and torting is an essential process when making a stacked cake - or it will be uneven. Also, gel coloring continues to impart color into buttercream frosting over time...  a good tip is to add a little coloring and wait a while before deciding if the color is perfect. This was all so overwhelming and exciting.

Let me just give you a little hint on how much I love wedding cakes. Food Network Cake Challenge, Cake Boss, Ace of Cakes - all tv shows that I frequently watch at work just to see the process and product of wedding cake baking. I think that big tall stacked cakes are magnificent, and I have always wanted to make one. When Laura hinted that she would be interested in me making her wedding cake, I didn't hesitate for a second - I basically jumped at the offer. Watching countless YouTube videos on cake decorating and structure was extremely beneficial for me, having never taken a cake class. I have always been a self instructed person, so this wasn't a huge to do. In high-school I baked often, and I even taught myself how to sew purses and eventually a backpack. I have to say thank you to Vincent's mom for supplying me with several wedding cake magazines that I received great tips from, in addition to the supplies that she pretended she already had in her cabinet, but I know she really went out and bought them for me because she was excited! Thanks Mrs. Julie!!!

So here is the process:

Step 1: Baking the Cake

Making a 3 tiered cake with 3 layers in each tier is a pretty big task in and of itself. That is a LOT of cake! The tier sizes were 6", 10" and 14". The middle 10" tier was chocolate espresso cake and the rest of the cake was white wedding cake - all from scratch (I wasn't going to mess around with mixes here). You will have to make 7 batches of the white wedding cake to fill the 14" and 6" for 3 tiers worth, and 2 batches of the chocolate cake will be perfect for the 10."

White Wedding Cake
2 2/3 cups cake flour
1 T baking powder
1/4 t salt
Sift together and set aside.


Preheat oven to 325. 
In the bowl of an electric mixer cream 1 1/2 sticks of butter. Slowly add 2 cups + 2 T sugar. Allow these to cream together until light and fluffy, about 2 minutes.


In a separate bowl, separate 4 1/2 egg whites. Whisk until foamy and add 1 cup + 2T of milk, 2 tsp vanilla, 1 tsp almond extract, 1 tsp lemon extract. These flavors really kick this cake up a notch! 


Begin mixing the dry and wet ingredients into the creamed butter and sugar, alternating the mixtures. Do not overbeat! Bake until slightly golden on top and a skewer comes out clean - 55 min for 14" cake with heated core or 25 min for 6" cake. Yum!


Chocolate Espresso Cake

1 1/2 cups all-purpose flour
1/8 teaspoon salt
1 cup (packed) cocoa powder 
2 teaspoons baking soda
1 teaspoon baking powder
8 ounces French roast coffee, freshly brewed and cooled
2 cups granulated sugar
4 ounces unsalted butter, room temperature
1 cup buttermilk
3 whole eggs
2 teaspoons Vanilla
1 teaspoon Almond Extract

Preheat the oven to 350 degrees F.
Sift the flour, salt, cocoa powder, baking soda and baking powder together. Reserve.
Brew a fresh pot of French roast coffee. Cool and reserve.

In a bowl of an electric mixer combine the sugar, and butter. Mix on medium speed until combined well. Scrape down the sides of the bowl. Add in the brewed coffee and combine on low speed.
Once combined, add in the buttermilk and then the eggs, 1 at a time.. Continue to mix on low speed. The mixture may look ‘curdled’ …this is ok.
Scrape down the sides of the bowl.

Gently fold in the sifted dry ingredients. Pour batter into the prepared cake pan and fill half way up.
For a 10" round with a heated core, bake for about 45 min.

yum.

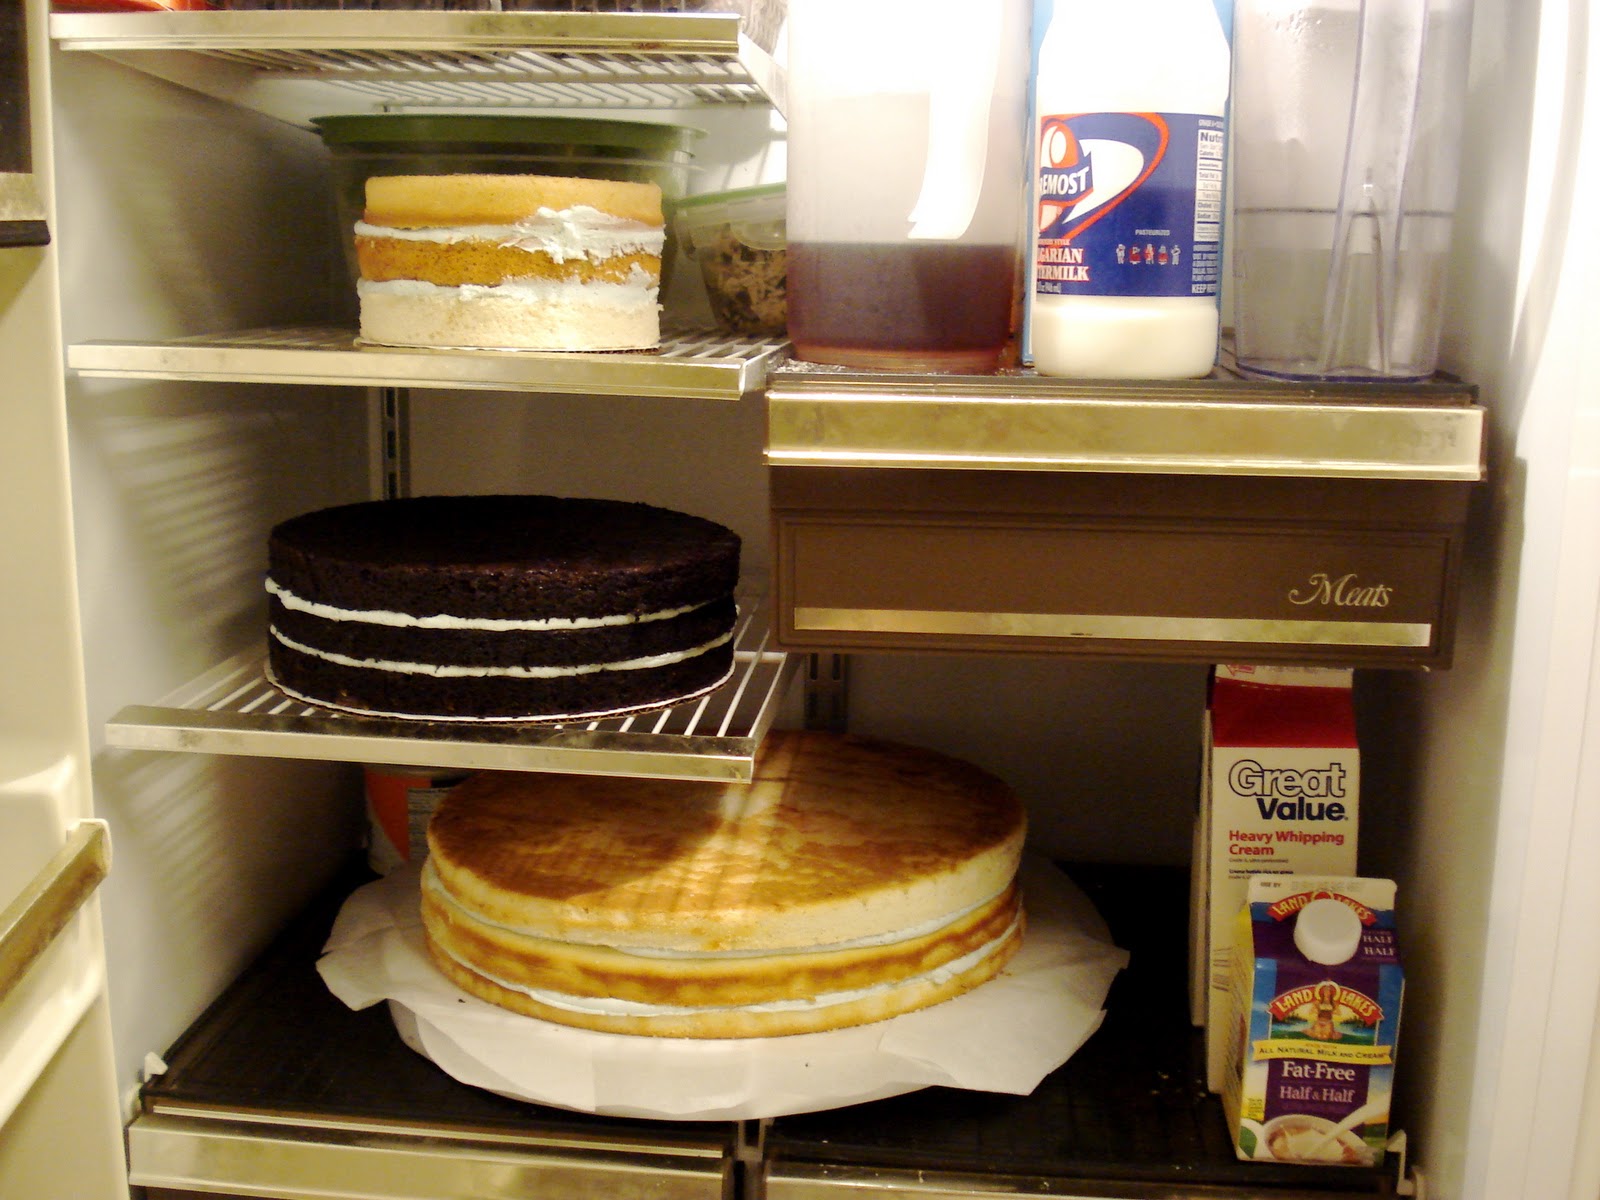
Step 2: Cooling and Storing the Cake


Once the cakes come out of the oven, it is essential to cool them properly. Allow them to come to room temperature in the cake pan on a wire rack. Then, Turn the cake out onto a cake board (you can buy these from Walmart in packs according to the diameter of your cake). Wrap the cake and board tightly in plastic wrap and freeze until ready to level and tort. 

Step 3: Making the filling
Organic Dark Baking Chocolate
For Laura and Kevins cake, we did alternating layers of red raspberry filling and dark chocolate mousse - it was heavenly. When you took a bite, you tasted bright tart raspberries, then creamy rich dark chocolate - and the almond in the cake really came through to enhance the chocolate flavors. If you're interested in those recipes, let me know! 

Step 4: Torting and Filling
This is a tedious task! Mrs. Julie bought me a cake leveler (thank you!) which is basically a metal wire, stretched tightly with a handle. I used this to cut the crown off of the cake and it is adjustable, so that you can actually cut the cake in half to fill between. The 14" cake was too big for the leveler, so my snazzy engineering boyfriend crafted me a homemade version using wooden dowels and beading wire (thanks Vin!) He really helped me out here with his engineering perspective, as we were constantly measuring the height of each layer - in order to make the final height of each tier within 1/2 inch of each other. You really don't want the tiers to look different in height. Also, something that my dad taught me when I was young often resonates with me as I cook - Mise en place... Everything in its place. This is very important in the torting and filling steps of making a multi tiered cake. Have the buttercream, cake, and filling prepped and ready to go! 


Icing Bumper
Once the cakes are cut into level layers, it's time to fill them. In order to do this, it's important to pipe a ring of buttercream around the outside edge of the cake, using just a coupler - or the end of a piping bag cut off. This prevents the filling from squishing out of the side of the cake once it's stacked tall - because it becomes very heavy!!! Then, begin to fill the cake, adding a few tablespoons at a time until there is about 1/2 inch of filling spread evenly - making sure that the filling is slightly lower than the icing bumper.


Using an angled spatula really helps to distribute the filling evenly and also aids in placing the next layer of cake on - and having it perfectly centered. Once all of the cakes are filled and even (you can check this using a level) it's time to chill them. I like to refrigerate the cake so that the filling is set, slightly hardened, and you can work on making the buttercream. (Get in your right mind and move any meat or other dirty things away from the cake. Make sure your fridge is a friendly place for an unwrapped cake at this point. Don't be nuts.)


Step 5: Butter, Cream, Butter, Cream - Buttercream!!!

This is essential. You can't serve yucky icing on a wedding cake. You can, however, use 12 pound of powdered sugar and 4 pounds of butter to make buttercream :) I never said it was healthy... but it's a really good wedding cake!

Buttercream Icing
2 sticks butter
1 cup shortening 
2 (2 lb) bags of powdered sugar
1 T meringue powder
1 T vanilla
1 t almond extract
1 t lemon extract


Cream the butter and shortening. Slowly add one bag of the sugar and the meringue powder. Add 1/4 cup cold water and the extracts and mix until creamy. Begin slowly adding the second bag of powdered sugar (prepare yourself for a kitchen haze of sugar) and alternate with a final volume of 1/2 cup of heavy cream to give the icing spreading consistency. I made 3 batches of this for the cornflower blue backdrop of the cake and 1 batch for the white piping detail. You will have to mix the gel coloring by hand, and you need to make enough so that you don't have to batches of colored icing - this way the color is consistent throughout. Vincent was slightly appalled at the sheer amount of butter in this icing, but he didn't hesitate to steel cake crumbs slathered with a little spoonful of this stuff :)


Step 6: Crumb Coating

Taking a portion of the buttercream, thin it slightly with a little bit of cream so that you can lightly coat the cake with it. This is called crumb coating. This sheer layer of crumb coating holds any crumbs that come off of the cake when you're coving it with icing so that once the cake is chilled and you go to put the thick layer of decorative frosting, the crumbs stay captivating inside of the crumb coating and you have a smooth and sexy finish. Refrigerate the cakes after crumb coating, and prepare the cakes for their thick coat of buttercream. 15 minutes should do the trick, trick!

Step 7: Icing the cake

Ok. My cornflower blue frosting was in a rubbermaid container at this point. Vincent and I had to take turns with a wooden spoon mixing the cornflower blue coloring into the white buttercream to achieve a perfect hue! It's very important that you keep the buttercream covered when you're working with a smaller portion of it. Take a piece of plastic wrap and pat it down directly onto the top of the buttercream in the container and then cover the top with several additional pieces of plastic wrap. If you think I'm crazy, go ahead and let your icing get crusty - you'll be angry and you'll have to make more. (not fun!). Cover it adequately.

What I like to do is to take some of the buttercream and place it into a piping bag with a coupler and no tip. This way, I can pipe big stripes of icing onto the cake and then use an angled spatula to smooth it out, rather than constantly dipping the spatula into the icing bowl and going back and forth. It keeps the icing fluffier and tastier!


As you can see, this is especially important on the chocolate cake because the crumbs are persistent little italians! I'm telling you... you will get angry at the chocolate crumbs if you are as OCD as I am! It's a wedding cake, people. No one wants to see those little crumbs sneaking out of the icing. The want to see the icing! Ok. Smooth it out with an angled spatula. It's not going to be perfect so this is what you do.

A. Dip the angled spatula in piping hot water and quickly dry it off. Use the hot spatula to smooth the buttercream. Repeat several times until the cake is looking pretty darn good!


B. Refrigerate the cake until the frosting is dry to the touch. This means that when you take your hand and give the top of the cake a little slap, your hand has no icing residuals on it... 20 minutes in a cold refrigerator should be good. Then, obtain a roll of thick paper towels that have no design imprinted on them (I used Viva) and a fondant smoother (or your hand... or anything small and flat for that matter). Place the paper towel directly onto the cake and using the smoother, press with medium pressure and move in small circles. Remove the paper towel (it shouldn't be sticking to the cake... you're in big doodoo if it is). Repeat this smoothing process all over the top and sides of the cake. Look at how great it looks! I had several people ask me if the cake was fondant, to which I proudly replied - no it's just really smooth buttercream. Pride, shooting out of my ears and nostrils, with me trying to act like it was no big deal. Yeah, it was awesome.

Step 8: Structure

Vincent was very helpful here! It order to have the cake stand tall and proud, it is essential to place wooden dowels into the cake to hold up the superior tiers. To do this, you have to think. Ok - the bottom tier was 14" and the next tier was 10", so that is a 4" diameter difference. Which means there will be 2" between the edge of the bottom cake and the edge of the middle cake on all sides. Right? (4"/ 2... 2"). Okay, so the dowels will need to be within a 2" ring of the outside. But really, I wanted the dowels to be 1" inside the edge of the 10" cake so that the center of the cake was really supported. So we measured to have 8 dowels placed 3" from the edge of the 14" tier. I have a college degree, follow me here. (and Vincent is really good with numbers haha). Woah Woah, we need to get a height estimate on the dowels now that we know where to place them, which we marked with toothpicks. To do this, we placed one dowel into the cake until it touched the bottom and then pulled it out. From there, we cut the dowel slightly below the icing line and cut the remaining 7 dowels accordingly. Insert dowels into cake and voila, we have structure. We repeated this process with the 10" cake, placing 4 dowels 3" from the outside edge. In the end, this really helped us to see exactly where to put the superior tiers when we were stacking the cake!

Step 9: Detail

Detail. Also known as broken hand/possible tendonitis!!! Laura wanted an intricate petal design on her cake, which took a lot of practice with different piping tips to get down - but I did it! (I think). Either way, I piped detail from 7 am - 1 pm on Saturday and I was glad once the detail was almost done because it is work! Very fun work :)


Having a turntable to set the cake on was very helpful at this point, so that I could swivel the cake according to my piping angle. Tedious, but very worth it!

Step 10: Transporting and Stacking the Cake

This was the scariest part of the whole process. I boxed each tier of the cake separately and I held the 14" cake in my lap (no box was large enough). Then, Vincent drove me ever so slowly to the wedding reception site. We walked into the reception area to make sure that the cake table was set up, which it was and then we carried each tier separately to the cake table. Stacking was probably the most nerve wrecking thing because several members of the wedding party were watching me and I wanted to make sure that the tiers lined up evenly and also I had to be extremely careful not to mess up my oh so wonderful hand piped petal detail. To my amazement, and with Vincent's help, I stacked the cakes easily without problems! Then, I piped a shell border in the seams of each tier.

And the final product...


The compliments that I received at the wedding were all so nice, and I am very proud of my cake! I hope that there are other opportunities to do this in the future, although I will have to at least request payment for the ingredients, as they easily totaled $150 - $200. A less complicated cake could probably be more affordable, depending on the fillings and cake recipe. This satisfied my senses of creativity for a while, and I was happy to do this for my friends as a wedding present!

Soon to come - Tech Cake II for the Castleberry family crawfish boil next weekend.

Wednesday, March 2, 2011

Indulgence Month!

Okay, so I've been on a blogging hiatus for the last week or so because I've been sidetracked by a very important upcoming event... Laura & Kevins Wedding! Several really great culinary events have happened, though. And I can't leave them out!


First, Gallatoires. My dad treated my sister Katie, her girlfriend Jen, and I to a dinner at Gallatoires - a New Orleans tradition. Located on the infamous Bourbon Street, this place is classic. You have to wear a coat to enter the door of this restaurant, so fancy attire is their way of keeping out the riffraff. The cuisine on the first floor is traditional cajun food stepped up to first class. Crab meat maison, oysters rockafeller, creamed spinach, fried eggplant, redfish with amandine sauce... yum! This event is definitely an indulgence. My dad, being the french quarter wine man, knows almost everyone who frequents Gallatoires - and with that advantage, we had an abundance of extra treats on the house! Katie and I started off with a drink made with cucumber gin, rosemary, and a floral liquor called St. Germain and I think there was also honey in it. Most delicious cocktail ever! We then moved on to a delicious and very special wine from Tablas Creek.

My main dish was a red snapper fillet topped with shrimp etouffee. Oh boy! That was a treat. It was like transformed gumbo (which we all know I love!) Everyone else at the table had some rendition of a grilled fish and a delicious sauce. For dessert - not to be skipped- bread pudding with bananas foster on top. This dessert meant business, and we could not collectively finish it because it was so filling! (but it was perfect)

Appetizers

Fresh Bread Every 5 Minutes!

Dessert
Apparently I was too excited to take a picture of the main dish! Oh well, you'll have to take my word for it :)

Procido Family
After being on a cloud for several days after Gallatoires, it was time to get to work on cake. I needed a little practice last week on my cake skills because the wedding is approaching and I could use all of the practice I could get! My friend Meg's boyfriend graduated from LA Tech (go dawgs!) so I made him a Tech cake that was alternating layers of chocolate espresso and vanilla almond. Buttercream decorations to go around. But wait! A bad thunderstorm rolled in right as I began to pipe designs on the cake, and alas... I was forced to complete the fanciness with a headlamp. Definitely a one time experience.

For the icing, I made the background sky blue so that the cake would be festive and pretty to look at and then I tried my hand at red icing. Let me just tell you, don't ever take red icing for granted! It took an entire tube of gel food coloring to dye chocolate buttercream icing red. I'm talking a cereal bowl worth of icing. That's a lot of coloring gel! It lends to a not too pleasant taste in the icing, so I only used red for the accents. All in all, I love the result of this cake!


Coming up soon will be the real wedding cake - all 12 layers of cake and zillions of raspberries of filling later. The event is in just 3 days!!!

On a savory note, I made some spinach rice pilaf to go with a nice grilled salmon filet and vegetable skewers. The pilaf was a last minute concoction, but hey - that's what cooking is about. We loved it! I promised Katie that I would post this recipe, because it is a must.

Spinach Rice Pilaf

1/2 cup orzo
1 cup basmati rice
1/2 yellow onion, diced
2 cloves garlic, chopped
2 cups chicken or vegetable stock
2 T earth balance
2 cups defrosted frozen spinach
small handful of cilantro, chopped
salt and pepper to taste

In a medium pot melt the earth balance and saute the onions until translucent. Add the garlic and the orzo and toast the orzo slightly for about 1 minute. Add the stock and basmati rice, stir. Bring this mixture to a boil, reduce the heat to a low simmer, cover and cook for about 15 minutes, or until the water is absorbed. Fluff the pilaf and incorporate the spinach into the rice. This takes a little effort, but using a wooden spoon, you should be able to fold the spinach into the pilaf so that the whole thing is somewhat green. If you prefer, you can puree the spinach with a little bit of stock in a food processor before adding it to the rice. Add some chopped cilantro, and/or parsley, salt and pepper to taste. For something snazzy, I added a handful of crumbled feta and a some toasted slivered almonds for crunch. Yum!

Wednesday, February 16, 2011

Chocolate Covered Monday

Valentines Day. A time for wasting money and the advertisement of childlike love... I mean really? Look, I'm Italian and as far as I'm concerned - Valentines Day is just a reason to allow myself to spend extra money at the store so that I can make some tasty treats. Russel Stover can shove it. I usually try to eat healthy meals, but I allow for exception on "special occasions." Another thing - I'm a Procido, which by nature means that I do things in excess. Speaking of health, dark chocolate is way more tantalizing and beneficial for the soul and body than milk chocolate. I much prefer using high quality bittersweet and semisweet chocolate than some gnarly milk chocolate hershey's chips. Chocolate covered strawberries are a must, then I made some dark chocolate ganache truffles rolled in nuts, toasted coconut, or dusted with cocoa powder. For dinner I made a delicious white wine sauce for a big pot of whole wheat linguine with shrimp. Roasted asparagus are what I call a fancy veg, but I'll eat those every night of the week! Yum. Yum. Yum.


For the chocolate truffles, making the ganache center is really easy! Chop 10 ounces of bittersweet chocolate with a chefs knife. (Chop chocolate from a bar or baker's chocolate. Chocolate chips have stabilizers that help them keep their shape, so the bar chocolate melts better). In a small saucepan heat 3/4 cup heavy cream on medium heat until small bubbles are rising around the edge of the pan. Add about 1/4 of the chopped chocolate. Stir until smooth and velvety and then combine the remaining chocolate with the cream/chocolate mixture. This is a simple way of tempering the chocolate - which is just a fancy way of not getting the chocolate above a certain temperature so that it stays glossy when it hardens later. Using a whisk, beat the ganache until all of the chocolate shavings have melted and you have a smooth and thick chocolate sauce. Add 2 tblsp. room temperature butter cut into pieces. Continue to whisk the mixture until it is combined. Line a square or rectangle dish with plastic saran wrap, using a large piece that extend at least 1 foot over the dish. Pour the ganache into the dish and smooth it out with a rubber spatula. Take the excess saran wrap and fold it over the ganache, pressing it directly over the surface. Refrigerate for about 15 minutes or allow the ganache to cool at room temperature for several hours. 

Dark Chocolate Truffles
Using two teaspoons scoop small mounds of the ganache onto a sheet pan lined with parchment paper. Refrigerate until the mounds are hardened. Using your hands, roll the ganache mounds into round balls - truffles! Refrigerate while you melt some chocolate. I usually melt a couple of more bars of chocolate in the microwave 30 seconds at a time, stirring in between, until melted. Prepare a tray with chopped nuts, toasted coconut, and cocoa powder - or any other topping you like. Set up a station so that you can take a ganache ball, dip it in chocolate, roll it in a topping, and drop it off to cool. Use two forks for the dipping process so that the ganache center is only covered in chocolate - but not dripping. Play with it! This is not rocket science. But it is chocolate excellence :)


Now that we have fancy chocolate for sharing, delicious dinner is a must. I was quite surprised and delighted to find some large shrimp in the freezer section at the store. They were gulf shrimp - about 12 count to a pound! I defrosted, peeled, and deveined them (important!). White wine sauce is one of my favorite pasta sauces to eat with seafood. I don't make it that often because it's expensive and it has butter in it - which is delicious, but not healthy! To make the sauce melt 2 tblsp. butter and 2 tblsp. olive oil in a pan. Add 2 chopped shallots and 2 cloves of garlic, chopped, and saute about 3-4 minutes. Season the shrimp with salt and pepper and add to the pan. Cook until pink and remove the shrimp. To the pan add 1/2 cup good white wine (I used a white burgundy from France)... by the way you should be drinking whatever you are cooking with at the present moment. Also, add the juice of one lemon and plenty of salt and pepper. Allow this to simmer for a few minutes, add half a pound of freshly cooked whole wheat linguine, the shrimp, a handful of fresh parsley and a sprinkle of pecorino cheese. Heaven!


For some greens, I made a yummy salad with half spring mix and half baby spinach, fresh blueberries, crumbled feta, toasted pecans, avocado sprinkled with salt and pepper, dried cranberries, a few parsley leaves and a champagne vinaigrette. We barely had room for this! The pasta was soooo good.


And of course, don't forget... Alpine and Pepper could tell something exciting was happening because I put a scarf on pepper, which she loved! I've never seen a dog with so much sass before as this little girl...


Tuesday, February 8, 2011

Cornflower Blue

In an effort to practice a semi complete product that will resemble the wedding cake that I am planning on making for the Burton-Perkins wedding, I had fun with some buttercream and cake... and lots of filling!


So this cake is a white wedding cake recipe with lemon and almond extracts. Very simple and light - thanks to the 8 egg whites that I whipped into fluffy perfection and delicately folded into the dense cake batter. Being a Procido, I couldn't just stop there. No. I made a dark chocolate mousse using 50%, 70% lindt chocolate bars and some bittersweet baking chocolate. In addition I also made a tart and sweet raspberry filling. The cake layers were alternating with these fillings and then slathered in the oh so delicious buttercream frosting. I am working with cornflower blue as a wedding color for my friend Laura, so the main cake icing was dyed using the gel Wilton dye. After the fact I realized that the dye continues to impart color over a few hours, so next time I will have to use less dye in order to achieve the lightness that I prefer in this icing color. I attempted a design using royal icing in white. This design was obviously intended for fondant and I know this because it was really bulky on the cake. I have pretty steady hands and I wasn't able to uniformly pipe this design just due to its nature. Oh well, I'll try fondant next! A work in progress for sure...

Monday, February 7, 2011

Quack, Quack, Multitask!

Few things are better than turning a simple ingredient into several flavorful dishes, all with their own flare. Thanks to Ina Garten, I know how to make perfectly roasted chicken breast. It's quite simple, actually. Buying the poultry as split chicken breasts with the bone in and skin on allow the chicken to roast with plenty of flavor and it shreds beautifully afterwards. All you have to do is brush the chicken breasts with olive oil and sprinkle with salt and pepper, roast in a 375 degree oven for about an hour. Easy! With this yummy chicken I made chicken pot pie, home made birthday dinner for Alpine and Pepper, and white bean chicken chili. Other uses for this chicken include a plethora of soups, for use in salads, or as the star of yummy sandwiches.

Ok... yes, you heard me right - I made my dogs their own home cooked birthday dinner. They turned two this weekend and I just couldn't help it! I was roasting all of this chicken and they were prancing around with their snouts in the air just searching for the crisp scent of roasted chicken, ears a- flapping! I boiled some jasmine rice with water, peas, and chopped carrots (which I already had out because of the chicken pot pie). I mixed this rice meal with a little shredded chicken and they ate it extremely fast and loved it!


Full bowls to empty bowls in record timing!

Chicken pot pie is something rather decadent and rich, usually. I tried to change that up a little and use a healthy serving of chicken stock with a touch of fat free half and half at the end for creaminess (rather than a whole quart of it). Also, for the pastry I made a whole wheat crust to pierce with your fork as you dig into the individual pie! If you are into this type of thing, give this a try

Chicken Pot Pie
4 split chicken breasts
2 cups peas
2 cups chopped carrots
2 cups onion
5 cups reduced sodium chicken stock
2 chicken bouillon cubes
1/4 cup fat free half and half
1/2 stick butter
1/4 cup whole wheat flour


Place chicken on a sheet pan, brush with olive oil, sprinkle with salt and pepper, and roast in a 375 degree oven for about an hour, or until cooked. Allow it to cool. Remove the skin and bones from the chicken and shred the meat, set aside. Heat the chicken stock and bouillon in a saucepan. In a soup pot, melt the butter and add the onion. Sauté until translucent, about 10 minutes. Add the flour and stir constantly for about 2 minutes. Add the chicken stock and stir until thickened. Add the peas, carrots, and half and half. To this add about 1 tsp salt and 2 tsp pepper. Stir until combined and taste for spice. A little handful of freshly chopped parsley really helps here. Serve 2 ladels full of the pot pie mixture into individual ramekins. If you desire, make a pie crust and top each one!


Top with pastry, brush with egg wash, and place a slit in the top.  Bake in a 350 degree oven for about 1 hour.


This recipe made 4 individual servings and also enough pot pie to fill an 8 x 8 pyrex dish that I froze for dinner on the next cold and tired night. On Saturday I wanted something roasted and cheesy all in one. I thought that pizza would do the trick! I made a delicious herbed half whole wheat pizza crust. While the dough was rising, I prepared my toppings:


Fresh chopped bell pepper, roasted bell pepper - which I skewered and charred directly over the gas flame on my stove, fresh greens, cilantro, an assortment of cheeses, caramelized onions, and roasted garlic - chop the top off of the whole bulb and place in a 450 degree oven for about 20 minutes, you'll be surprised how earthy and nutty roasting can make the garlic... it's completely transformed. Also, I made a classic béchamel sauce to add an extra creamy element to one pizza. To make the white sauce, heat together an equal portion of melted butter and flour and add milk or fat free half and half until a creamy but thick sauce forms. Sprinkle with salt, pepper, and nutmeg and you've got a winner! Yum! Don't be afraid to mix and match toppings - I usually make a pizza, then Vincent makes a pizza and if we have a friend over they make one too! (Relatively small in size). The roasted chicken that is great in everything is also a nice addition to a pizza!

White bean and chicken chili was more of an afterthought when I had 2 extra chicken breasts and Vincent's mom mentioned that a friend made her a batch. I thought - oh, perfect! All I did was sauteed an onion in some olive oil, added a box of store bought chicken stock, a can of white beans, 1 1/2 cups of frozen corn, 2 tsp each of cumin, hot mexican chili powder, oregano, salt, pepper. Then I added the chicken and simmered for about 30 minutes. A little red pepper flakes and hot sauce for an extra kick and you have a nice easy soup!

See how the chicken is a multitasker? It is very helpful to make one ingredient like chicken into multiple dishes because when I cook on the weekends, I save leftovers for work. It also saves money on ingredients because you can stretch the one pack of chicken over several meals, bulking it up in the ones where it really counts! Hopefully you can enjoy some of this yumminess too!

Wednesday, February 2, 2011

Stir Fried Rice

I love the stir fried rice at RAW sushi bar in Ruston. There is something simple and delicate about it that makes you want to eat the whole plate and nothing else. I've been working on a way to make something similar and I think this time I may have gotten fairly close. Also, Vincent and I love to eat stir fried vegetables with sesame ginger soy marinade on them. So last night for dinner I decided to do a little tango with the two of them, and voila! 

Stir Fried Rice
1 cup Jasmine Rice
1 1/2 cups water
2 scallions
1 egg
sesame oil
butter or earth balance
sesame seeds

Step 1: Combine rice and water in a medium pot and bring to a boil. Reduce heat, cover, and simmer for 15 minutes. Take the lid off and allow the rice to cool.

Step 2: Heat a wok over medium high heat. Add 2 Tblsp. butter or earth balance and 1/2 Tbsp. sesame oil. Allow the oil and butter to heat until you smell a strong sesame scent. Add the rice and stir it continuously, using a wooden spoon. This will remove the water from the rice, giving it that perfect "stir fry" texture. Continue to cook the rice and stir frying it for about 5 minutes. Add the chopped scallions and cook for an additional minute.

Step 3: Reduce heat the medium. Make a well in the center of the rice and crack the egg into the well.


Step 4: Using a silicone spatula, scramble the egg with quick cutting motions. Try to avoid bringing the rice into the egg scramble until it is cooked.


Step 5: Incorporate the fried egg into the the rice... making fried rice!


Step 6: The secret. Use a dry skillet and add about 1/4 cup of sesame seeds. Toast these over medium heat until golden and fragrant. Sprinkle them over you rice!!!


Yum! While all of this was going on, I made asian stir fry with shrimp. Here's how it goes...
Choose your favorite vegetables and wash + dice about 3 cups worth. I used snap peas, red bell pepper, carrot, asparagus, baby portobello mushrooms, and broccoli. I always add chopped scallions at the end. Place all of your veggies in a wok and add about 1/2 cup of water. Cook over medium high heat with the lid on for about 10 minutes, or until the vegetables are steamed to tenderness or desired crispness. Make a sauce! Play with it... this isn't science. I used 1/4 cup soy sauce, a little less than 1/4 cup rice wine vinegar, 1/2 lime juiced, 2 tsp sriracha hot sauce, 2 Tblsp brown sugar, 2 tsp honey, 2 cloves garlic, 1 square inch piece of fresh ginger - grated on a microplane, 2 scallions. Whisk it all together and pour it over the steamed vegetables. Kick the heat up to high and allow the vegetables to absorb the sauce for about 3-4 minutes while some of it reduces. In a separate pan cook the shrimp and add them just at the end so that they do not get overcooked. Delicious!!


Friday, January 28, 2011

Black Bean Sequel

I didn't forget about my promise to elaborate about the Southwestern Turkey Burgers that I made last week. These originated from my mom's kitchen several years ago as an alternative to the traditional burger (my mom, sister, and I all steer clear of red meat). My mom makes hers with lean ground turkey, rotel tomatoes, and black beans. I love black beans, so anything with them in it is almost always delicious to me! These turkey burgers are perfect for freezing. In fact, I always freeze the entire batch first - even if I'm grilling some the same day. I think the freezing process helps to hold together the robust burgers. In addition to turkey burgers, I recently made my famous fresh and zesty salsa, and a pot of mexican chicken + tortilla soup. Yum! Usually the turkey burgers last a month or so in the freezer, but this time Vincent had eaten all of them by the time my shift was over :) If that's not incentive to try these, I don't know what is!

Southwestern Turkey Burgers
1 package of lean ground turkey (about 1 lb)
1 can reduced sodium black beans, drained and rinsed
1/4 cup minced purple onion
2 scallions, chopped
1 egg, lightly beaten
1/4 cup panko bread crumbs
1 head of fresh cilantro, chopped
1/2 tsp worcestershire sauce
1/2 - 1 tsp crushed red pepper
2 tsp hot pepper sauce (I used Crystal)
1 tsp cracked black pepper
2 tsp sea salt
1 1/2 tsp cumin
1 tsp oregano


This is simple. Get ready! Mix together all of the ingredients except the turkey. Break up the ground turkey and incorporate it into the vegetable and spice blend just until mixed - do not over mix or the meat will be tough when grilled. Line a sheet pan that will fit into your freezer with parchment paper. Use a 1/3 cup measure to portion out the turkey burgers. Fill the measuring cup, lightly packing in the burger mix with your fingers. If you dip your fingers into cold water it will help to prevent the meat from sticking. Turn out the 1/3 cup portion into your hand and roll the burger into a ball, place it onto the parchment lined baking sheet, and press out into a burger shape. Once all of the burgers have been formed, cover with saran wrap and freeze for about 2 hours. Wrap each burger individually in saran wrap and store in a ziplock bag for up to 2 months. When you are ready to eat them, defrost the burgers in their saran wrap in a dish filled with a little cool water for about 2 hours. Heat a griddle pan on medium heat and grill on each side about 3-4 minutes. Top with a slice of cheese at the end if you desire! Serve with sliced avocado, spicy mustard, and a hefty serving of baby lettuces on a whole wheat bun, or eat it with a small portion of brown rice with a side salad!


Turkey Burger with Slightly Singed Sweet Potato Fries
Okay - forgive the sweet potato fries. I wasn't paying enough attention. Now... for the next thing! I have been making this fresh salsa since last spring. Vincent's mom was coming over and I wanted a snack but wasn't really sure what to make. My mom makes a similar salsa for pool snacking, so I followed through with creating another rendition of her black bean use. Fresh and Zesty Salsa, yum yum! Vincent loves this salsa and it's perfect to make on the weekend and have as a light snack throughout the week. We like to eat it with blue corn chips, but it's great on anything!

Fresh and Zesty Salsa
1 can reduced sodium black beans, drained and rinsed
1 can corn, drained and rinsed
5-7 roma tomatoes, seeded and diced
3 scallions
1 head of cilantro
1 large or 2 small Anaheim peppers with seeds, diced
1 tsp Cumin
Mexican Hot Sauce
Zest and juice of 1 lime
Salt and Pepper


Chop it up, throw it in a bowl, mix it and enjoy! If you plan on serving this at a party, you can dice an avocado too! I try not to do that every time so that the avocado doesn't brown. 


It's so good - you won't be able to stop eating it!

If you think that all of the ingredients of the past two recipes are entirely too similar, think again. How many times have you been to a mexican restaurant and deliberated over which special to order before deciding? They all have the same ingredients - but they are oh so different. Anything with black beans and/or cilantro usually tastes amazing, so if you agree I would definitely suggest theses recipes. The burgers are flavorful and healthy - packing much needed protein with a low fat to protein ratio, along with many veggies that are incredibly nutritious! The salsa is fresh and cooling - a perfect snack! And now, a hot and comforting mexican chicken soup!

The last few times that I have eaten at Newks, a fresh sandwich/salad place in Shreveport (my soon to be new home), I have ordered the pesto chicken sandwich and tortilla soup half and half combo. The mexican tortilla soup has a base of onion, celery, carrot, tomatoes in their juice and chicken stock. It is bulked up by black beans and corn, a mexican staple, and shredded chicken adds a healthy touch. a dab of sour cream, crunchy tortilla strips, and a few slices of cool and creamy avocado are perfect toppers for this yummy bowl of soup!

Mexican Chicken Soup